 Recently, I moved this site from nichesitetool.com to nichesitetools.com and I did a lot of research prior to making the switch. I kept track of my steps along the way so that I could share all the details here with you today.
In this post I will show you all of the steps needed to move your WordPress site from one domain name to another the right way, with the least amount of impact to existing traffic and rankings.
Before You Get Started
Before we jump right into the steps, I need to highlight a few things. Switching to a new domain, even when done properly, will temporarily affect your traffic and ranking data.
It takes time for the search engines to adjust to the switch over, so you do need to realize going into it that you will experience a dip in traffic and ranking data initially. This is completely normal and something everyone experiences when switching to a new domain name.
However, following the steps in this post will help to minimize any potential impact.
In this post I will assume that you have some technical knowledge of how to navigate your WordPress dashboard and how to transfer files to your web hosting account via FTP or by utilizing an interface like cPanel.
Webhosting Hub provides the cPanel interface for site management, which is what I utilized for all of the steps mentioned below.
Quick Start
I find that I really enjoy the “Quick Start” guides many companies now include with their products these days, so I thought I would include one here.
If you are very technically savvy and have a good idea of what is required to move a site to a new domain name, here is a very quick outline of the steps to help get you going. The full details will be provided further down below.
- Backup existing site with plugin like Updraft Plus
- Use Duplicator plugin to take a full copy of existing site and download the 2 files created
- Add new domain name to your web hosting account (if not done previously)
- Create blank WordPress database for your new site/domain name
- Copy the files that Duplicator created over to your new site/domain name
- Run the Duplicator installer.php file
- Go to new site in your browser and test
- Add new domain name to your Google Analytics and Webmaster Tools account; Be sure both old and new domain names were verified via same method
- Access WP Dashboard on new site and check any plugins that might need new account details or a refresh, such as Google Analyticator, XML Sitemaps, nRelate, etc.
- Submit sitemap in Google Webmaster Tools for new site and check for errors
- Add the following lines to the top of your main .htaccess file on your old site to automatically handle individual page 301 redirects. Be sure to change www.newdomain.com to your new domain name.
RewriteEngine on
RewriteRule ^(.*)$ http://www.newdomain.com/$1 [R=301,L]
12. Submit a Change of Address request to Google within Webmaster Tools; You can also do the same via Bing Webmaster Tools if desired
Detailed Steps to Move WordPress Site To New Domain Name
Step 1: Create a Full Backup
Before you get started it is very important to create a full site backup. There are lots of different plugins that you can utilize, the one I use is the free plugin called Updraft Plus.
Step 2: Install and Run the Duplicator Plugin
Now that you have a full backup, you can begin the process to take a full copy of your existing site. I found that the easiest way to accomplish this is by utilizing the free Duplicator plugin. Install the plugin and first click on the option to check your server’s compatibility.
Hopefully your site meets all the requirements, if not, get in touch with your web host to resolve any issues. Assuming all is well, click on the ‘create button’ as shown in the image below.
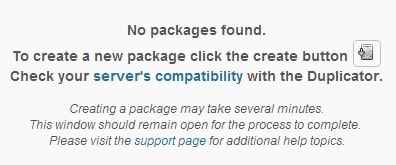
If it does not work the first time, click the create button again. It should complete much faster and if there were any problems the first time, you should be good the second time through.
Once complete, click the installer and package buttons on the next screen to download the files to your computer.

Step 3: Add Your New Domain to Your Web Hosting Account
You may have already done this step, but if not, add your new domain to your web hosting account. This step varies from web host to web host, so be sure to check with yours to get the exact steps if needed.
My web host utilizes cPanel, so I went there clicked on the ‘AddonDomains’ icon. Be sure to allow enough time to pass for your new domain to be accessible via web browser. This can take between 24 and 48 hours, but in my experience this usually takes less than an hour or two.
Step 4: Create a Blank WordPress Database For Your New Site/Domain
In order for the Duplicator installer file to run properly, the plugin creators recommend creating a new blank WordPress database for your new site/domain name ahead of time. It is possible to try and have the installer.php script create a blank database for you, but that did not work in my case and that is why they recommend creating the blank database manually before hand.
The process for creating a new MySQL database varies from web host to web host, so check with your hosting company for full details if needed.
I went into cPanel, clicked on the MySQL Databases icon and then put in a name for a new DB and clicked on ‘Create Database’. I then added a new user, set a password, gave it full access and associated it with that database.
Be sure to keep the database and account name/password handy as you will need them when running the Duplicator installer.php later.
Step 5: Copy the Duplicator Installer and Package Files To New Site / Domain
Previously you downloaded the installer.php and filename_site_package.zip files to your computer. Now you will need to upload them to your new site / domain via whatever method you prefer.
Most web hosting companies allow FTP access or provide a file manager via cPanel or both. Use whatever method you prefer and drop the files directly into the home directory for your new site.
Step 6: Run the installer.php File From Your New Site
Now that you transferred over the installer.php file along with the .zip file, you will run the installer by going to http://www.newdomain.com/installer.php, replacing newdomain with your own new domain name.
You will then be presented with a screen similar to the following:
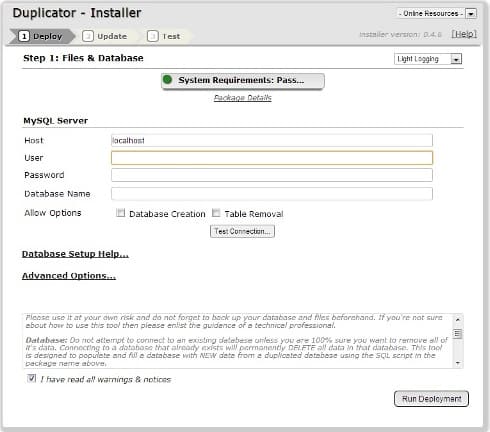
On that screen, you will put in the database account, password and database name that you created in Step 4. Be sure to uncheck the ‘Database Creation’ check box and check the ‘I have read all warnings & notices box’ after reading through that. Then click on the Test Connection button.
Assuming your account name/password and database name are correct, the connection test should be successful. You can then proceed to click the ‘Run Deployment’ button.
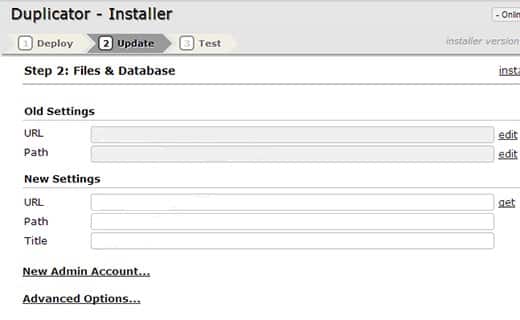
Once that is complete, you will see a screen similar to the one below. The Duplicator plugin tries to guess your old and new URLs and Paths. For me, the information was correct, I just plugged in a new site Title and was good to go. If needed, go ahead an modify any of the settings as necessary and continue.
Once the process is complete, the Duplicator plugin will remind you to take the post installation steps. The first step is to re-save your WordPress permalinks.
Login to your new site’s WordPress admin page using the same username and password that you had on the old site. Then go to Settings -> Permalinks in your new site’s WordPress dashboard and click on the save button.
After that, be sure to delete the installer.php, installer-data.sql and the installer-log.txt files from your root directory using either FTP or something like the cPanel File Manager.
Your new site should now be fully functional utilizing your new domain name, but we still have a few more steps to complete.
Step 7: Test Your New Site
Now that your site is fully functional on the new domain name, you should go through and fully test things out to make sure all your posts show up, all of your links work and that your images/videos are all functioning normally.
Step 8: Add Your New Domain Name to Google Analytics and Webmaster Tools
Go into your Google Analytics account and add in your new domain name and add the site to Webmaster Tools as well. Be sure that your old site is in Analytics and Webmaster Tools as well. Both your old and new sites will need to have been verified as owned by you previously in order for the Change of Address step to work later on.
Make sure to verify both your old and new sites in Webmaster Tools via the same method. For example, if you utilized the method to upload a file provided by Google to your site to verify ownership, be sure to utilize that same method on both sites.
If you don’t, the change of address step later on may fail. I had to re-verify ownership of my old site and new site utilizing the same method in order for that step to work.
Make note of the Google Analytics ID for your new domain, as you’ll need that to enable Analytics on your site.
Step 9: Check Your Plugins on the New Site
Check your plugins on the new site to see if any of them need setting changes or a refresh. For instance, now that you have your new Google Analytics ID from the prior step, you can input that ID into a plugin like Google Analyticator.
I also utilize the XML Sitemaps plugin and in order to generate a new site map, I clicked the option to manually create a new one.
Additionally I utilize the nRelate, related posts plugin. In that plugin I told it to clear the cache in order to get my related posts to start showing up again.
Depending on what plugins you utilize, you might need to go through each one to make sure they are refreshed or updated with any new details as required.
Step 10: Submit a New Sitemap inside Google Webmaster Tools
This is just one additional method of testing that you can perform to double-check that all is working as planned.
On your Webmaster Tools home page, select your site. In the left sidebar, click Site Configuration and then Sitemaps. Click the Add/Test Sitemap button in the top right. Enter http://www.newsite.com/sitemap.xml into the text box that appears, replacing newsite with your own new domain name. Click Submit Sitemap.
If all goes well, it should succeed with no errors.
Step 11: Add 301 Redirect Entries To The .htaccess File On Old Site
Add the following two lines to the top of your .htaccess file on your old site in order to automatically redirect all of your posts and pages from the old domain name to the new one. Replace newdomain with your new domain:
RewriteEngine on
RewriteRule ^(.*)$ http://www.newdomain.com/$1 [R=301,L]
The .htaccess file will be located in the home directory of your old site. Edit the file via cPanel file manager, if applicable, or via FTP or whichever method you prefer.
Please note that once you add the following two lines to your .htaccess file and hit save, you will no longer be able to access your WordPress Dashboard on your old site, since it will redirect to the new site.
If you would like to access the WP Dashboard on your old site for any reason, you would need to modify that .htaccess file via the same method and either comment out or remove those first two lines temporarily.
Google does not recommend redirecting your entire site with a site-wide 301 redirect. This particular method will redirect requests on the fly, rather than redirecting your entire site, which is the method Google prefers.
Most sites recommend keeping your old site and the redirects active for at least 6 months, to give Google ample time to re-index and rank your new site.
Step 12: Tell Search Engines That Your Site Moved
To tell Google your site has moved, go into Google Webmaster Tools and click the old site. Then click the Gear icon and select ‘Change of Address’. If both the old and new sites were verified via the same method previously, as mentioned in Step 8, you should be able to choose the new verified site from the drop down list and click submit.
You can also do the same via Bing Webmaster tools if desired.
Step 13: Celebrate, You’re Done!
It may seem like a rather lengthy process, but since you have all of the steps right here in front of you, all you need to do is go through them step by step and you’ll be done in no time.
I did run into a few small issues, but if you follow the steps above as I laid them out here, you should avoid those same issues and sail right through.
Results
So far I’m only 2 weeks into the migration to the new domain name, but I think the results are pretty good. The data from my Google Analytics account is below.
The data for the old site is for the entire month of November. The data for the new site is only for 2 weeks from Dec 15th-28th and it is also during the Christmas holidays, at a time when I had no new posts.

Old Site – Full Month of November

New Site – Dec 15th thru Dec 28th Only
Additionally, all of my posts on the new site are now indexed by Google.
Based on these preliminary 2 week results, I would say the migration to the new domain has been a success so far. I will be sure to keep an eye on the results over the coming weeks and months and will report back with any significant updates.
I hope that this guide helped you move your WordPress site to a new domain name. If this guide helped you, then please don’t forget to share it. I appreciate all retweets and Facebook shares.
Please let me know if you have any questions. If you have any suggested modifications or changes, be sure to drop me a comment or email as well.
I’d also like to take this opportunity to wish you a very Happy, Healthy and Prosperous New Year!
References:
Thank you very much for putting this information up. I am currently moving a site and I am going through the guide and finding it extremely helpful as I am very new to wordpress
regards
Darren
Thanks for the comment Darren. Glad the post is helpful, let me know if you have any questions.