
Podcast: Play in new window | Download
Subscribe: RSS
I get this question quite often and it boils down to this…”I’ve installed WordPress, now what?!”
First off, if you’ve already taken some action, great, but in case you haven’t, the first step would be to check out my step-by-step guide on how to start a WordPress blog or website.
By following those quick and easy steps, you will be up and running with your very own website running on WordPress, in 10 minutes or less.
Once you have WordPress installed, there are a few key items that everyone should do immediately afterwards.
Be sure to listen into the Podcast Episode for a more detailed breakdown.
Some of the links below may be affiliate links. If you decide to make a purchase, I would receive a commission, at no additional cost to you. If you do make a purchase, I sincerely thank you ahead of time.
Top 10 Things To Do After Installing WordPress
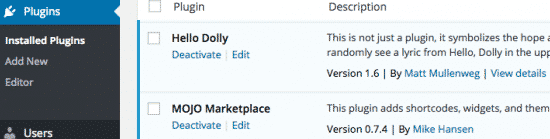
1.) Remove unused plugins, themes and the default WordPress post, page and comment from your WordPress Dashboard.
Most WordPress installations come with a few pre-installed plugins like Hello Dolly, Mojo Marketplace and possibly others. I recommend uninstalling all of them for now.
To do so, click on Plugins on the left hand side and then select deactivate (if any are active) and then you will see an option for delete.
WordPress comes with several themes pre-installed, like Twenty Twelve, Twenty Fourteen and Twenty Fifteen. I recommend deleting all of them except the most recent one, which as of this post would be Twenty Fifteen.
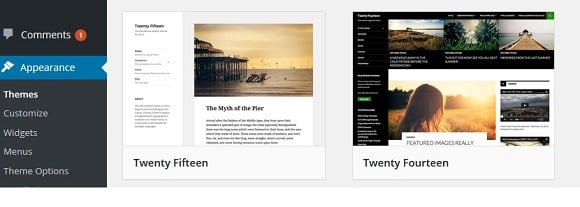
Go to Appearance -> Themes, click each theme and then in the lower right click Delete.
WordPress also comes with some default sample content. To delete that, select Posts -> All Posts then hover your cursor over the post in the main pane and select Trash.
To delete the sample page, select Pages -> All Pages, hover your cursor over the sample page and select Trash.
There is also a sample comment, select Comments on the left hand side, hover over the comment and select Trash.
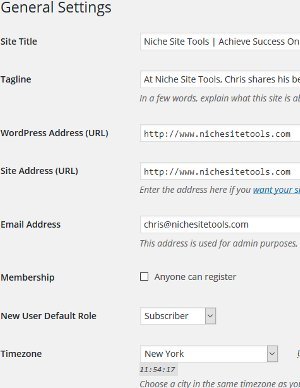
2.) Edit your Title, Tagline, Timezone and Favicon. The first three settings can be found in the WordPress dashboard under Settings -> General.
There are two ways you can upload a Favicon with most web hosts.
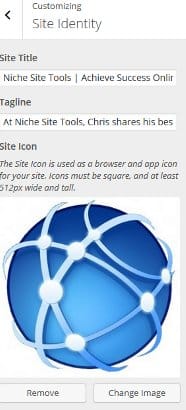
With WordPress 4.3 and above, there is a new way to set the Favicon. It can be found under Appearance -> Customize -> Site Identity. The file must be at least 512×512 in size and can be any of the normal default image formats like .jpg, .gif or .png.
Most web hosts also allow you to place a 16×16 .ico file in the main directory of your website. You can go into your cPanel, go to FileManager and upload the file to the main website directory and call it favicon.ico. You can download free Favicons of this format here.
Once you’ve uploaded your Favicon with one of the methods above, open a private/incognito window in your browser and you should see your new Favicon in the tab of your browser when going to your site.
![]()
3.) Change permalink structure. This is a very important step, that I also mentioned in my how to start a blog guide.
A permalink is the URL for content on your website. By default, it will be very ugly and contain a post number, but none of the keywords from your title. This is terrible for SEO.
You want to change the permalink settings so that WordPress automatically takes the main keywords from your title and puts them in the URL for the post or page.
To do this, go into Settings -> Permalinks and choose the option for Post name and hit Save Changes.

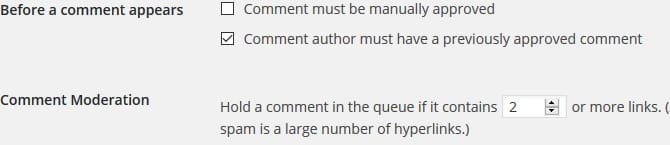
4.) Change discussion/comment settings. On the Settings -> Discussion page, click the checkbox to “Comment author must have a previously approved comment” and also set it to hold a comment in queue if it contains more than 2 links.
5.) Install a premium theme. Make sure to choose one with good training tutorials, qualified and responsive support and preferably one with lifetime upgrades.
My top recommendation that meets all of those criteria would be Elegant Themes, but several others that have also served me well include Thesis, Splash and ThemeForest.
Two other choices that have some recent buzz in the community include Thrive Themes and ThemeFuse.
6.) Enable Google Analytics and Google Search Console
(formerly Webmaster Tools).
Google Analytics allows you to see detailed stats about your website traffic.
This is very important, as it allows you to see where people are coming from, see how long they’re spending on your website and it can help identify your most popular posts, just for starters.
First you need to sign-up for a free Google Search Console account. Then you can install the Google Analytics plugin, login to your account from there and Google will begin keeping track of your website stats.
7.) Install essential plugins.
There are 5 plugins that I recommend installing on all of your WordPress websites and 3 additional that are optional, but suggested as well.
Akismet – Eliminates comment spam automatically.
Yoast SEO – Handles the technical search engine optimization of your site & assists with optimizing your content.
Pretty Link Lite – Shrink, beautify, track, manage and share links.
Limit Login Attempts – Limits brute force hacking attempts to your website.
Updraft Plus Backup and Restore – Excellent free plugin that can automatically take backups of your site and send them to an external source. I highly recommend you sent them to a site like DropBox. If you don’t yet have a DropBox account, if you sign-up through my affiliate link we’ll both get an additional 500MB for free.
Jetpack – This one has a ton of useful features, like social sharing, including of related posts below your content, photon cloud caching of your images and much much more.
Contact Form 7 – Simple to use plugin for enabling forms, like a contact form, on your site.
W3 Total Cache – Caching plugin that can help speed up your website. Check with your webhost for optimal settings.
8.) Add post categories and menus.
Adding WordPress categories and menu items can go a long way towards helping your audience navigate your website, can help to keep folks on your site longer and category pages also help with the all important internal backlinking for your site.
To setup category pages you just go to Posts -> Categories and then create some new post categories there.
Then when you create new content, you can select the different relevant category or categories for each post there in the right hand column and those posts will then be linked to on those category pages.
Some of the categories that I have set up are Affiliate Marketing, Product Reviews, Podcast and WordPress, just to name a few.
Once you have a few categories setup with content in each, you can then include your category pages in menus along the top of your site to assist your audience with navigation and to also help them articles specific to certain topics.
To create or edit your site menu, go to Appearance -> Menus and then modify as you see fit. You can see the items that I’ve chosen for the menu along the top of this site.
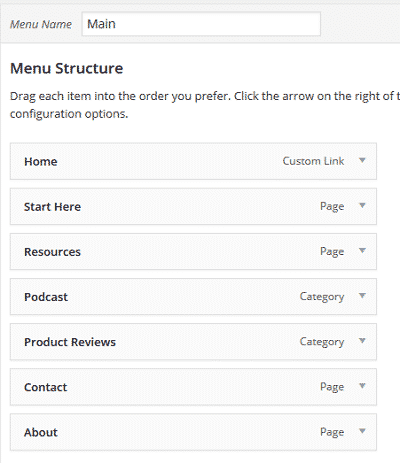
I have my Start Here page, About, Contact and Resources pages linked to at the top. I also have two of my Category pages up there as well.
9.) Create contact/about/affiliate disclaimer/privacy pages.
It is important to have a few specific pages on your site. An affiliate disclaimer page and privacy page are required by the FTC here in the US.
These sites can help with you generate a Privacy Policy and Affiliate Disclaimer/Disclosure page. This WordPress plugin might help also.
An about and contact page are not necessarily required, but I would definitely recommend creating them from the start.
On your About page, tell a brief story about why someone should come to YOU for whatever it is you’re talking about on your site. Tell them how you can help them.
On your contact page you should include all the different ways you want someone to reach you. Minimally you should have a way for someone to email you, like a contact form, but you’ll also want to link to any of your relevant social media accounts.
10.) Create an email lead magnet, sign-up for an email subscription service and utilize multiple methods for gathering emails.
When it comes to building your email list, that is not the time to be passive or utilize phrases like “Subscribe to my Newsletter”.
No one wants to sign-up for another newsletter.
To entice someone to open up and provide you with their email address, you really need to provide them something useful in return.
That should be something that can help them solve a particular problem or overcome a common hurdle that is relevant in your particular niche.
It does not need to be lengthy and really, it shouldn’t be. A 1-2 page guide would do the job just fine.
I recommend you create a quick eGuide and save it as a PDF file.
You can then make it available automatically, by configuring a welcome email through an email subscription service.
I recommend and utilize MailChimp and this can be accomplished for free.
I also recommend that you setup MailChimp to automatically deliver new posts to your subscribers as well.
This is also free, via their RSS to email tutorial.
Now you just need to make it easy for someone to sign-up. It is important to try and capture emails multiple ways.
For instance, I have the bar along the top of my site, the box below each post/page, the box in the upper right in my side bar and I also have a box that pops up when someone goes to leave the site.
In that way, I’m increasing my odds that someone will see an opportunity and sign-up.
For me personally, the bar along the top of the page and the “exit intent” pop-up far outperform the box below my posts and in the sidebar.
For you, that might be different and you might want to experiment with other options like slider bars, different graphics and experiment with one type vs another.
For that reason, I recommend choosing a proper email opt-in plugin to help ease the process.
Recommended Email Opt-in Plugin – Thrive Leads
Thrive Leads is an all-in-one tool that provides any type of opt-in box that you can imagine from the top bar, in-line forms, sidebar widgets, two step forms, slide in boxes and the all important exit intent pop-up.
They provide great looking templates that you can run with right away, or you can also fully customize them to meet your needs.
In addition, they make it super easy to do A/B split testing so that you know you’re using the opt-in boxes that result in the most conversions.
They also provide excellent step-by-step tutorials and training, all for a one time fee of $67 for one site, or $97 for an unlimited number of websites.
Your email list will be your most important asset, so you want to be sure you’re doing everything you possibly can to collect emails addresses the right way from the start.
I highly recommend you check out their quick video here for more details.
Conclusion
If you followed the steps above, you have a solid foundation for success.
Questions? Don’t hesitate to reach out via my contact page or via the comment section below.
Thanks and best of luck with all of your online adventures!
Chris, Affiliate Disclaimer/Disclosure link is not working.
Thanks a bunch Sam! That is weird, because it was working fine at the time the post went live. Seems something broke on their site, it gives an application error. I changed the link.
Chris recently posted..Cheaper Alternatives to Long Tail Pro
by the way great article. Helps me a lot!
Excellent. Thanks so much for the feedback Sam, it means a lot. Let me know if I can be of any further assistance.
Chris recently posted..Free Affiliate Marketing Training Program